Soldering 101
Page 1 of 1

Soldering 101
![]() by Admin Fri Apr 29, 2016 10:48 pm
by Admin Fri Apr 29, 2016 10:48 pm
Here is information about soldering. It may sound very trivial, but this basic information for those who want it. If you have your own way of doing things, that's great!!
Components
Soldering Iron:
Electric
This specific soldering iron is plugged into a wall outlet and is powered with electricity to heat the tip.

PROS:
-As long as you have a powered outlet you can keep soldering
-Convenient controlled soldering iron temperature
CONS:
-Not portable
Gas
There is also a gas powered soldering iron. This type of soldering iron uses heat created from the combustion of gas and oxygen to heat the tip of the iron.

PROS:
-Portable
CONS:
-Needs gas to work
-For long soldering jobs you will be refilling every 2-3h
-You need a lighter to ignite the flame
-Tricky to handle temperature of the soldering tip
SUMMARY
In my opinion the electric iron is better, however, it is best to own both. This way you can have the convenience of doing portable jobs for soldering.
Heat-Shrink:
Heat shrink is a rubber tubing that goes around the soldering job done on wires. You want to use heat shrink that is almost double the size as your wire. This is to avoid the tubing from getting stuck and not covering the exposed wire and solder.
After you have cut a piece off you will slide it through your wire and apply heat to shrink it. The most effective tool to use is a heat gun. A dirty method would be to use a lighter, but I would not advise it.
Solder
This is the item that you will be heating up with the iron tip in order to melt it onto a surface. It has a low melting point compared to other metals and it is conductive.

There are different kinds solder, such as LEAD-FREE and LEAD solder. They look the same and you cannot tell them apart. At least until you actually use it. From my experience I LEAD-FREE solder does not stick to wire and burns before it does anything else. It's very frustrating. However, the LEAD solder sticks to wires very well and makes life of soldering easy.
LEAD-FREE
PROS:
-Fumes from soldering are less harmful
CONS:
-Does not stick worth a damn to wire when soldering
-It will make your life hell
LEAD
PROS:
-Solder sticks very well to wire and other soldering surfaces.
CONS:
-Fumes from LEAD soldering are harmful so do not breath them in if you can avoid it.
SUMMARY
I personally like to use the LEAD solder. If you can make the LEAD-FREE solder work for you, great!!
Soldering
I first learned how to solder with an electric soldering iron and LEAD-FREE solder. I believe the best place to start is by soldering two wires together. Its very easy to practice as you can find spare threaded wire around your work area or at your local electronics store.
Soldering Wires:
1. Plug in or lite up your soldering iron.
2. If your soldering iron has an adjustable temperature 300 Degrees is best. If its adjustable with no labeling try setting it to the middle setting.
3. While your iron is heating up, start stripping your wires. Personally I like to strip one 1/2 and inch and the other wire 1 inch. This makes it easy to wrap them together.
4. Cut a piece of heat shrink that is about double the size of your exposed wire and slip it on before combining the wires.

4. Cross both wires together.

5. Loop the longer wire in the smaller wire.
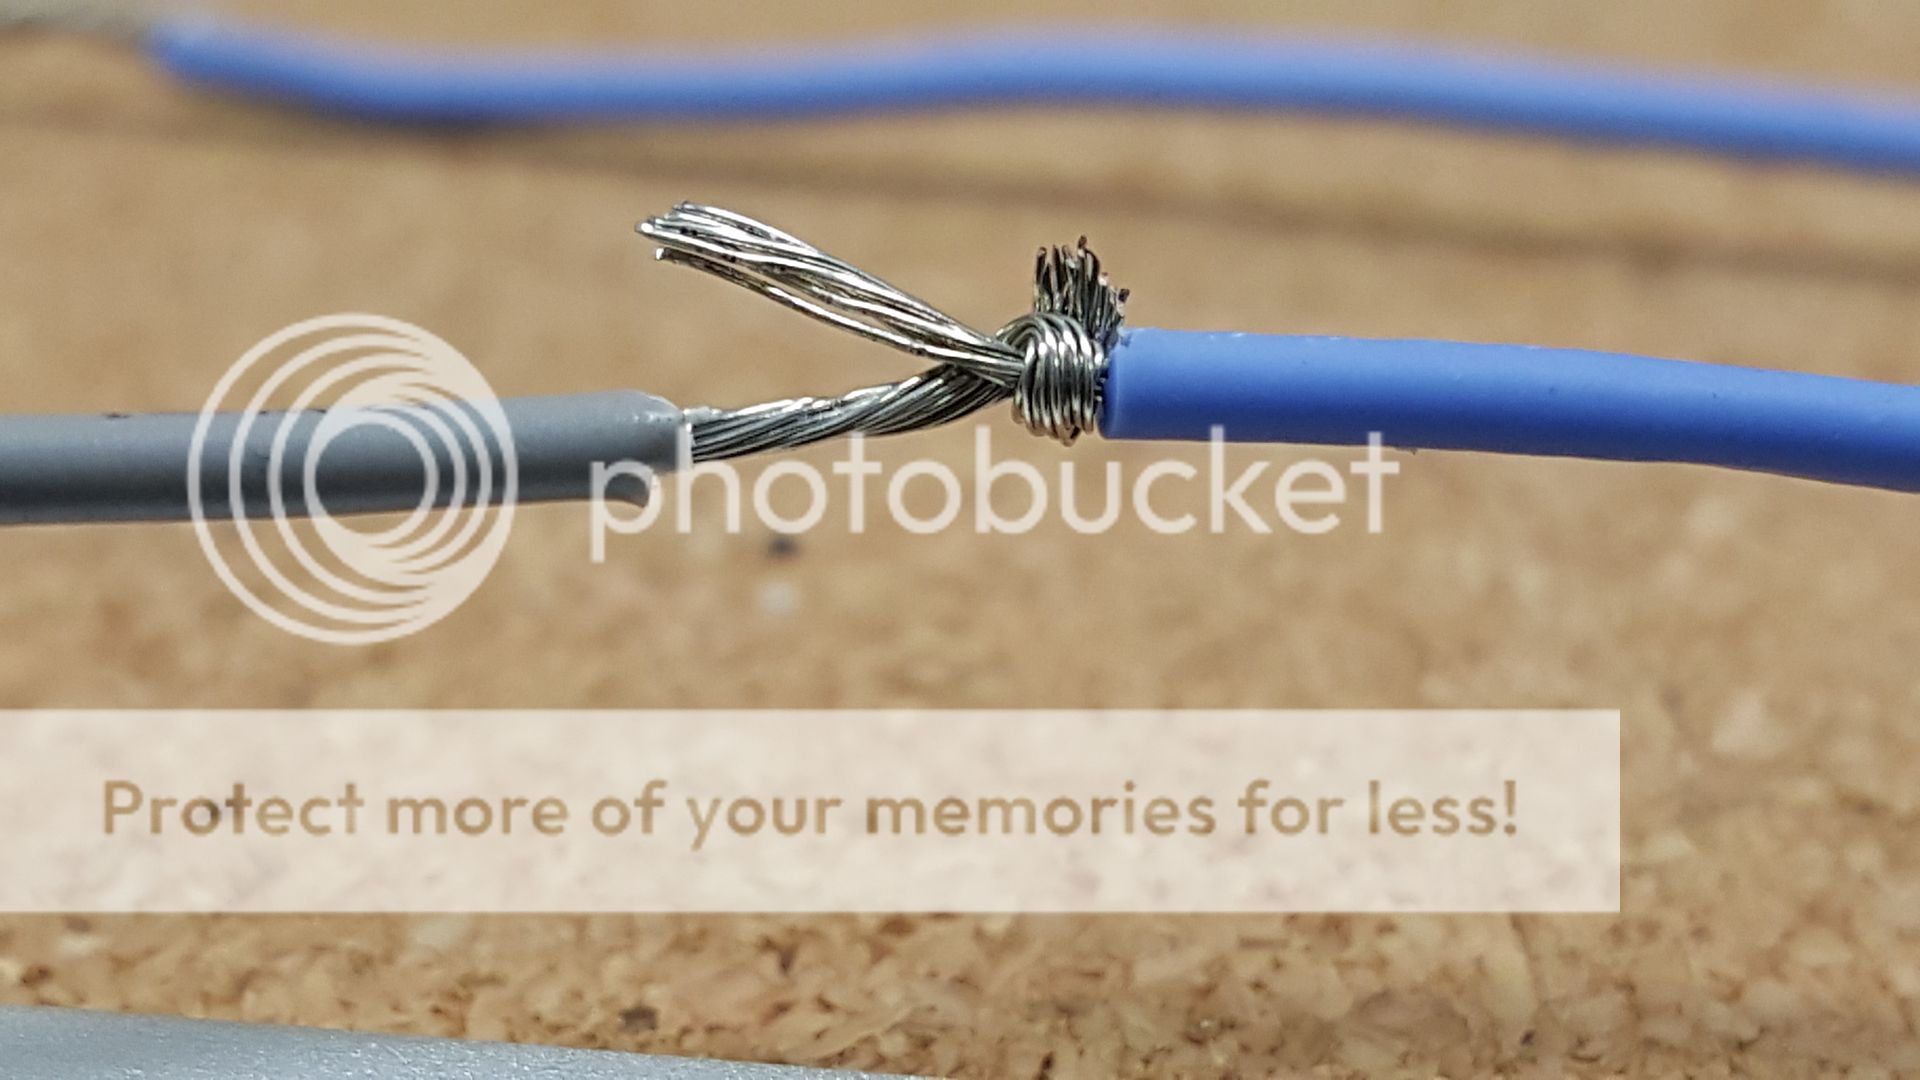
6. Continue wrapping until the wires are nice and wound.

8. Begin soldering by melting some on the tip of the iron first then slide it on the wire as you continue to apply solder.
**Video below for reference**
9. Slide the heat shrink over the exposed wire and use a heat gun to warm up and shrink the heat shrink. Use a circular motion to prevent burning.
**Video below for reference**
Components
Soldering Iron:
Electric
This specific soldering iron is plugged into a wall outlet and is powered with electricity to heat the tip.
PROS:
-As long as you have a powered outlet you can keep soldering
-Convenient controlled soldering iron temperature
CONS:
-Not portable
Gas
There is also a gas powered soldering iron. This type of soldering iron uses heat created from the combustion of gas and oxygen to heat the tip of the iron.
PROS:
-Portable
CONS:
-Needs gas to work
-For long soldering jobs you will be refilling every 2-3h
-You need a lighter to ignite the flame
-Tricky to handle temperature of the soldering tip
SUMMARY
In my opinion the electric iron is better, however, it is best to own both. This way you can have the convenience of doing portable jobs for soldering.
Heat-Shrink:
Heat shrink is a rubber tubing that goes around the soldering job done on wires. You want to use heat shrink that is almost double the size as your wire. This is to avoid the tubing from getting stuck and not covering the exposed wire and solder.
After you have cut a piece off you will slide it through your wire and apply heat to shrink it. The most effective tool to use is a heat gun. A dirty method would be to use a lighter, but I would not advise it.
Solder
This is the item that you will be heating up with the iron tip in order to melt it onto a surface. It has a low melting point compared to other metals and it is conductive.
There are different kinds solder, such as LEAD-FREE and LEAD solder. They look the same and you cannot tell them apart. At least until you actually use it. From my experience I LEAD-FREE solder does not stick to wire and burns before it does anything else. It's very frustrating. However, the LEAD solder sticks to wires very well and makes life of soldering easy.
LEAD-FREE
PROS:
-Fumes from soldering are less harmful
CONS:
-Does not stick worth a damn to wire when soldering
-It will make your life hell
LEAD
PROS:
-Solder sticks very well to wire and other soldering surfaces.
CONS:
-Fumes from LEAD soldering are harmful so do not breath them in if you can avoid it.
SUMMARY
I personally like to use the LEAD solder. If you can make the LEAD-FREE solder work for you, great!!
Soldering
I first learned how to solder with an electric soldering iron and LEAD-FREE solder. I believe the best place to start is by soldering two wires together. Its very easy to practice as you can find spare threaded wire around your work area or at your local electronics store.
Soldering Wires:
1. Plug in or lite up your soldering iron.
2. If your soldering iron has an adjustable temperature 300 Degrees is best. If its adjustable with no labeling try setting it to the middle setting.
3. While your iron is heating up, start stripping your wires. Personally I like to strip one 1/2 and inch and the other wire 1 inch. This makes it easy to wrap them together.
4. Cut a piece of heat shrink that is about double the size of your exposed wire and slip it on before combining the wires.

4. Cross both wires together.

5. Loop the longer wire in the smaller wire.

6. Continue wrapping until the wires are nice and wound.

8. Begin soldering by melting some on the tip of the iron first then slide it on the wire as you continue to apply solder.
**Video below for reference**
9. Slide the heat shrink over the exposed wire and use a heat gun to warm up and shrink the heat shrink. Use a circular motion to prevent burning.
**Video below for reference**

Admin- Admin
- Posts : 10
Join date : 2016-03-31 -

Page 1 of 1
Permissions in this forum:
You cannot reply to topics in this forum|
|
|